When you enter a holiday potluck carrying a basket studded with savory lollipops, people pause their conversations to check out what you’ve got there. At least that’s what happened when I brought these Cheese Ball Pops.
The idea of converting the cheese log recipe I posted a few years ago into bite-sized lollipops came to mind after I saw a Goat Cheese Pops with Herbs, Pecans and Bacon appetizer on Mom It Forward. While I was at the grocery store, collecting all of the ingredients to make the goat cheese pops for the potluck, I realized that way you make the pops is remarkably similar to the old familiar cheese log…except it’s on a stick.
So I went back to that cheese log recipe. Instead of rolling the cheese and honey mixture into a log I just rolled them into little balls. I made them a little on the small side (think Dum Dums rather than Blow Pops) so they could neatly be consumed in a single sweet and savory bite. People really went for these – they thought it was a fun spin on the traditional appetizer. I’m sharing the recipe and rolling technique that I used but I’ll bet you could easily adapt almost any cheese log recipe into pops. Give it a try!
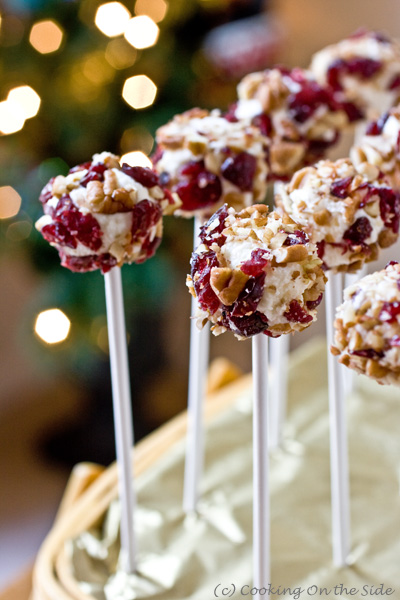
Cheese Ball Pops
Adapted from the Cheese Log recipe from the side of a Lucerne Reduced Fat Milk carton and inspired by Mom It Forward and The Kitchn
Prep time: 20 minutes | Cook time: 0 minutes | Total time: 20 minutes
Yield: 16 pops
INGREDIENTS:
- 1/2 cup finely chopped pecans
- 1/2 cup finely chopped dried cranberries
- 4 ounces crumbled feta cheese, at room temperature
- 4 ounces cream cheese, at room temperature
- 1 cup Swiss cheese, shredded
- 2 teaspoons honey
- 16 lollipop sticks
DIRECTIONS:
- Combine the pecans and cranberries in a shallow dish.
- Mix the cream cheese, feta, Swiss and honey in a food processor until it’s combined. Measure out the cheese mixture a tablespoon at a time and roll each spoonful into a ball with the palms of your hands. Then roll each ball into the pecan-cranberry mixture, coating all sides evenly. Place each ball on a tray lined with parchment or waxed paper. Insert a lollipop stick into the center of each ball. Carefully cover the tray in plastic wrap and transfer it to the refrigerator to chill for at least one hour.
- Remove the tray from refrigerator 15 minutes before serving.
- OPTIONAL: If you’d like to display the cheese log balls in an upright position, you can do so using a block of styrofoam (found at craft stores) to hold the lollipop sticks in place.
Such a great idea and I love all the cheeses you’ve put in them.
Lovely presentation! What’s more fun than food on a stick?
Darling idea for a holiday party. Love it!
Wow wow wow. This is a genius idea!!
ok you win most creative recipe girl!
excellent idea for the holidays
These look so beautiful and festive!
Yum, these look so tasty! Totally perfect for a holiday party. 🙂
What a fun idea for cheese balls! Love it.
Great idea! It’s the first time I see a “pop” appetizer – so cute! Happy and yummy 2012 to you, Kathy!
Hi Kathy, This is Amber from Brashear Kids, I just wanted to let you know we shared your creative cheese ball pops recipe in our round up! We think this recipe is absolutely genius! Thanks so much for sharing it!
http://thebrashearkids.blogspot.com/2013/11/thanksgiving-round-up-creative-eats.html
If I brought these to a holiday party, I’d hope I didn’t get too many red lights in traffic. I’d probably eat one (OK, three) each time the car stopped!
Brilliant. This is the perfect party appetizer.